Monday, June 9, 2014

Week 23: New Refreshing Beverage

It has been HOT in New Mexico for the several days. Therefore, there was no better time to try out this citrus flavored iced tea


The New:
I found a drink recipe called "muddy water" on Pinterest (of course) and so I decided to make it with dinner last night. The directions I found were a tiny bit confusing, so I admit that I partially made it up as I went along, but fear not: it came out nothing short of awesome. You need:

12 oz. orange juice frozen concentrate
12 oz. lemonade frozen concentrate
2-3 quarts of brewed black tea

Basically, all you have to do is combine them and enjoy. I have a Mr. Coffee tea maker, so I brewed 2 quarts worth of tea without filling the pitcher up with ice. I then filled the pitcher to the 2 quart line with water and added both frozen concentrates, which consequently cooled the tea right off, as they were both frozen :) Doing it this way makes a little less than three quarts.

That's it!

The Evidence:


The Verdict:
Between the boyfriend and myself, I only have a quart left of this magically refreshing drink, meaning we polished off 2 QUARTS in less than 24 hours. Simply put, we love this drink! The citrus flavors were very prominent, so I think next time I'll try 3 quarts of tea and see if it makes a difference in how much tea flavor I'm able to taste. Other than that, I'm hooked and will continue drinking this wonder throughout the rest of this hot New Mexico summer!

Sunday, June 8, 2014

Summer Dates

There is no doubt at this point; it is SUMMERTIME! And now that my boyfriend is much closer to me, and by much closer I mean living a mile away from me, we have plenty of dates to go on this summer. There are several that we are planning on using for double dates too! Here is a list that I will be adding to as I/we think of more :)
I would love to hear some of your favorite things to do with your sweetheart during the summer in the comments section :)


  • Go swimming at night
  • Grown up slip n' slide on a tarp with paint or shaving cream
  • Picnic
  • Watching the clouds pass by
  • Using food coloring to spruce up a traditional water gun fight
  • Watch fireworks
  • Going camping 
  • Visiting the zoo
  • Running through golf course sprinklers together
  • Water balloon fight (we're thinking of filling some with shaving cream too)
  • Day trip to the lake
  • Hike a local trail
  • Making homemade ice cream or popsicles
  • Game night with other couples (Panemopoly is first on our list- it is our own creative way of making a Hunger Games themed monopoly. Pictures soon to follow :))
  • Learn a new dance together and show if off together at a local bar (we loooove to go two-stepping)
  • Create masterpieces out of sidewalk chalk
  • Enjoy a bonfire
  • Visit a farmer's market/flea market/yard sales
  • Do some grilling
  • Attend an outdoor concert
  • Take lots of pictures

I will continue adding to this list as I think of more :) 

Whether you're in the middle of a summer fling or you're working on your 50th year with someone, enjoy them. Far too often it seems to me, people take each other for granted and slowly begin forgetting how to love, cherish, treasure, and prioritize the people who really matter. This applies to friends, lovers, family members, everyone. And although I came up with this list in the context of dating someone, these would be fun things to do/try with anyone that you care about. Maybe one of these things would be the perfect way to reconnect with someone who you haven't seen in a while! I don't know, but enjoy these ideas and the people around you!

Thursday, June 5, 2014

Week 22: New Homemade Sugar Scrub

I know how late this post is, but I promise I will not get too far behind! You see, since since my semester ended I have been working full-time (for the first time ever), and spending my most energetic hours with the kids in our summer program. Needless to say, it is exhausting! However, being nearly halfway through 2014 (crazy right?) I refuse to give up on my resolution. I have lots of new stuff planned out for these summer weeks, and no one will be more disappointed than me if I skip a week of it! So without further ado, keep reading to discover how to get the softest skin everrrrr!


The New:
Shaving your legs is great. Shaving your legs with a new razor after using a homemade sugar scrub is worth blogging about. My legs have never ever been so silky smooth with such little effort! So little effort in fact, that I was able to pull it off before work this morning. I got out of the shower over 12 hours ago, and my skin is still soft to the touch and is sufficiently moisturized (and I was in 90+ degree heat in the dry New Mexico Sun for several hours today!).

So you are probably more than ready for me to share my secret with you at point, and here it is:

Mix together the following ingredients and scrub your body with them.
3/4 c. sugar
1/4 c. oil (I used vegetable this time, but will use baby oil in the future)
1 Tbs. lemon juice


The Evidence:

This is the only picture I have for you because, well, taking pictures of me using it in the shower didn't seem quite appropriate. Anyhow, this is what it looks like all mixed up.


The Verdict:
I was completely satisfied with this dandy little trick. Like I said, my skin is still soft, 12+ hours after using this! And I didn't even put lotion on when I got out of the shower, so I know that it was the oil working it's magic.
As I mentioned above, next time I will use baby oil as opposed to cooking oil, only because I think I will like the smell better. Speaking of which, you could probably add some sort of essential oil to kick this puppy up a notch.
This batch was more than enough for my entire body, so if you want to make a single-use 'serving' try halving the recipe. If you love it as much as I did and are convinced that this is something you need on hand, double it and keep it in a container that won't let water seep in.

Enjoy your smooth legs ladies :)


Monday, May 26, 2014

Week 21: New Nail Techniques

The New:
During the middle of a busy semester, I rarely find time to paint my nails, so when I don't have the burden of assignments, tests, and projects due each week, I like to keep my nails painted.
This week, I tried two new techniques for the very first time:
  • Nail stickers
  • Using a bobby pin to make polka dots
The Evidence:

 These are both pictures of the nail stickers I decided to use! I think I found these at Wet Seal, but I would be willing to bet that you can find these nifty little things just about anywhere that sells nail polish.


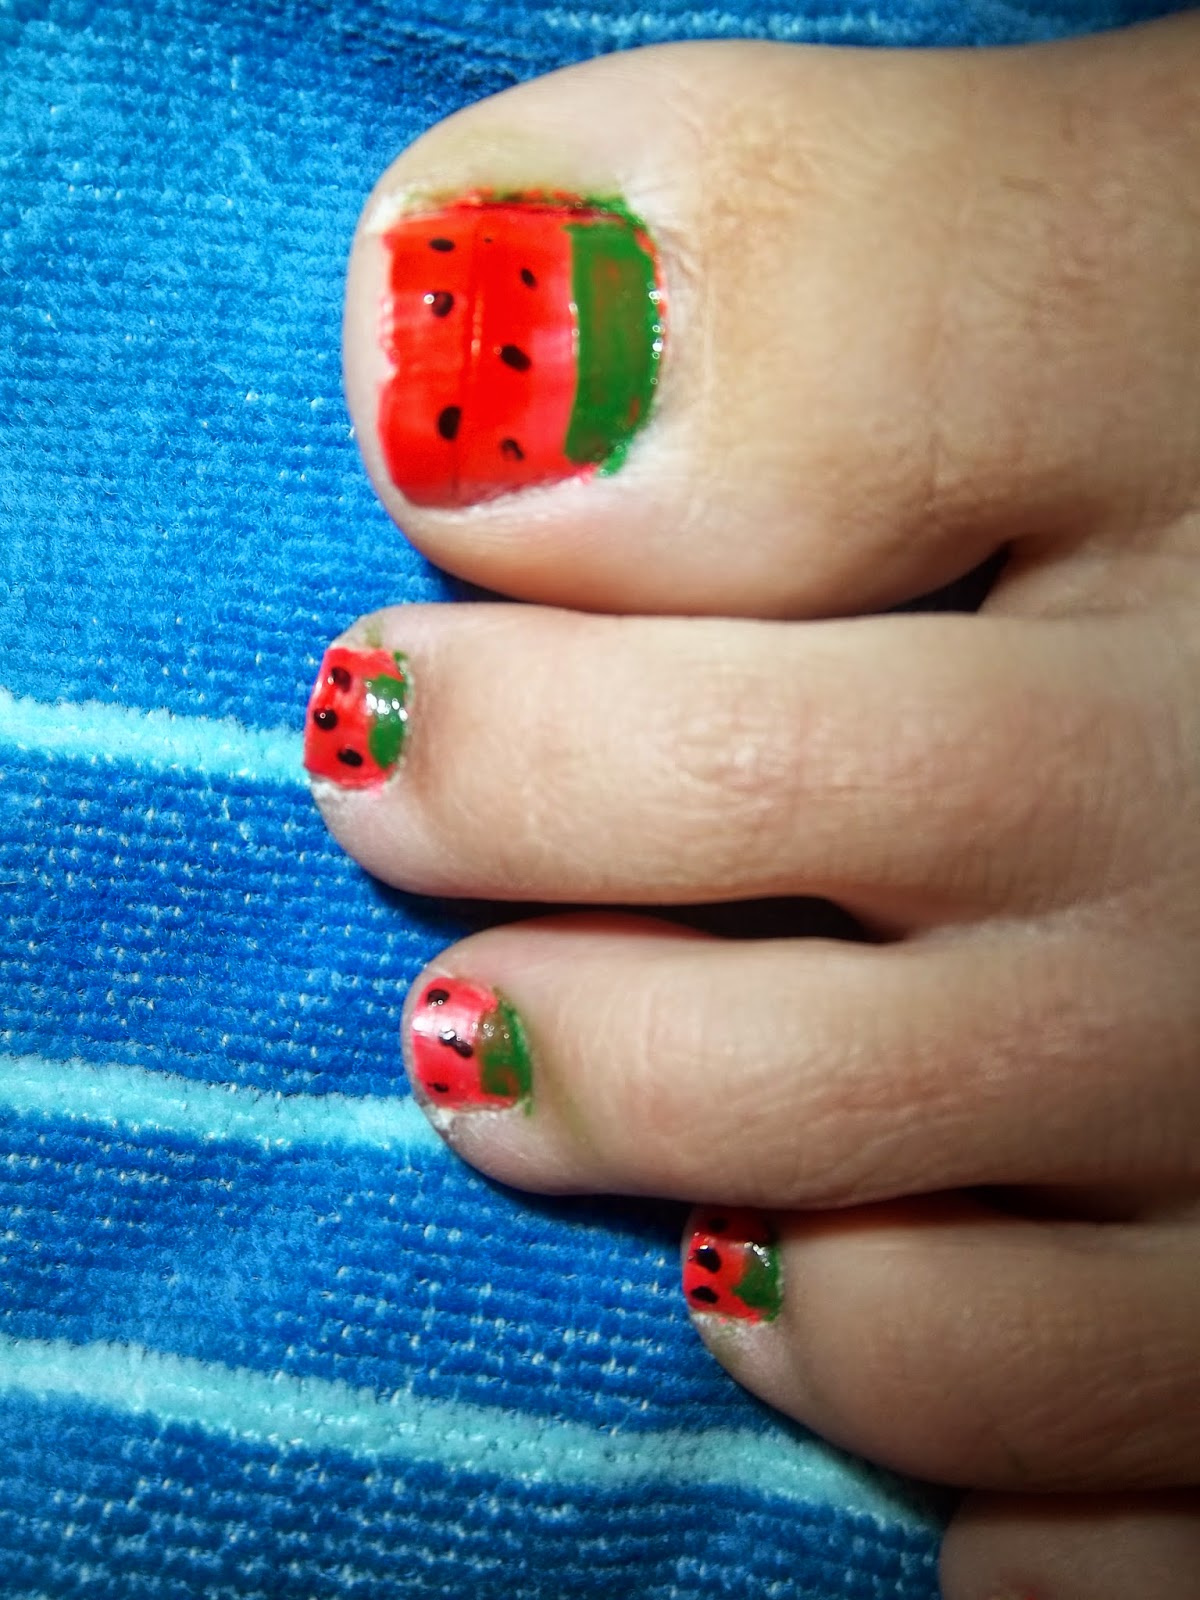
This is where I used the bobby pin trick! My mom and I paint watermelon slices on our toe nails every summer, and we've been doing this for as long as I can remember. However, this was the first time I had ever used a bobby pin to make the seeds, and it worked much better than just using the brush from the nail polish!


If you would like to do watermelon slices on your own toes, it's ridiculously simple! Just paint your entire nail a pinkish-red, and when its dry paint a green stripe at the base and add some black dots for seeds.


The Verdict:
So far, I am sufficiently pleased with both of these. The nail stickers were incredibly easy, and they gave my at-home manicure a little something extra. Like I said, I have been painting watermelon slices on my toes for as long as I can remember, but never have the seeds looked so good! Using a bobby pin was a great replacement for attempting to get the brush to make a small dot in just the right place. There was so much more control with the bobby pin.
In short, these are both techniques that I will return to in the future.


Have a wonderful Memorial Day everyone!

Monday, May 19, 2014

Week 20: New Pasta

Food again, I know. But this stuff was awesome! Check it out:


The New:
This week, I made a brand new pasta recipe that I found on Pinterest (of course!). Here is the original link to it, but I made my own variations.

Pasta with Tomato Basil Sauce:


  • 2 cans (14.5 oz each) Italian style tomatoes
  • 2-3 cloves minced garlic
  • 1/4 cup fresh basil leaves, finely chopped
  • 1 Tbs. parsley flakes
  • 1/4 cup oil (I used vegetable oil)
  • 1 lb. pasta 
Directions:
1. Cook pasta according to the directions on the box.
2. Meanwhile, combine the rest of the ingredients in a bowl and set to the side until pasta is done cooking.
3. When pasta is done, strain it. Pour the sauce over top and mix it into the pasta well.

That's it! I think chopping the ingredients took longer than anything else, but you could very easily put everything into a food processor or blender and pulse them until they were combined to your liking.


The Evidence:

This is my lovely boyfriend pulling his weight for this meal ;)


 This is what the tomatoes will come out of the can looking like. I was perfectly happy with this, but if you like your sauce to be less chunky, put them in the blender and pulse them until you're happy!


Yummy!!


The Verdict:
This recipe was simple, flavorful, and boyfriend-approved. If I were to do anything different next time, I would saute the garlic before adding it in. It was actually a little bit spicy, so I would like to try it without that kick next time. Other than that though, I can't imagine anything stopping me from making this recipe again.


Thursday, May 15, 2014

Week 19: New Face Mask

Since this week marked the end of this semester for me, I decided that a relaxing face mask would be the most perfect thing to fit my "new" requirement for last week (I know I'm 2 days late with this post, but not to worry, I have more new stuff coming for you so I won't be behind). However, as I began to look through the loads of face masks that I have shamelessly pinned, I found that I didn't have ingredients for most of them, and didn't feel like going out to buy them. So rather than calling this "relaxing," I would use words like "painful but effective"... check it out!

The New:
So this face mask only requires 2 ingredients. I am all for using stuff I already have on hand, so this is the one I chose. All you need is a little bit of milk and a packet of gelatin (unflavored of course). It would also be useful to have a plastic cup to mix up this beauty, because I get the feeling that cleaning this concoction out of a real cup is not something that anyone would feel like spending time on. Also, a plastic spoon or a popsicle stick to spread it on your face is probably more desirable than using your hands.

Once you have everything you need, mix 1 packet (they usually come in a box of four, and the contents of 1 packet measure out to be slightly less than 1 Tablespoon) with 1-2 Tablespoons of milk until it is a thick, gloppy mixture. Then you just heat it up in the microwave for 10-15 seconds and smear it on your face where you have blackheads, dead skin, or peach fuzz that you want to get rid of. I did my whole face, but it's not necessary for everyone. When its all dry, just peel it off and be amazed at how soft your face is!

Just a few quick notes before I get to the evidence and the verdict:

  • As soon as you heat it up, get to smearing!! It solidifies pretty quick, so the quicker you get it on there, the better.
  • This stuff HURTS to peel off, so be prepared. It really gets everything, but I guess there is a price to paid for that kind of intensity
  • That said, it could very easily pull out eyebrow hairs, so avoid them if you can. If needed, you can use water to wash it off hair that you don't feel like ripping out.


The Evidence:


I added just a tad more milk after taking this picture, so you have an idea of the consistency. Although, I'm pretty sure it's not an exact science. I get the feeling this stuff will get the job done, even if you use slightly different proportions.


The Verdict:
As I said above, this stuff is quite painful to pull off. Places like my upper lip and my temples were darn-near torture to get, but it wasn't terrible on my nose, chin, and forehead.
I did find it quite effective though! When/if I decide to use this again, I won't be doing my whole face. I feel like this method would work really well for back acne or arm acne, where there aren't so many nerves.


Monday, May 5, 2014

Week 18: New Craft

Well, yesterday was my first anniversary with my boyfriend, and it was lovely. Last year for my birthday (before we were even dating), he surprised me by driving 3 hours to visit (as he lived in a different city at the time) and then take me out to a really nice Italian place. He took me there again last night, and I don't know how this happened, but we ended up in the exact same booth as we were in on my birthday. Not to bore you with the rest of the mushy details, we had a fantastic time celebrating this last year we had together.

I promise this is relevant! You see, I'm about to share with you what I made for him on this special occasion :)


The New:
I am especially crafty, but I don't get a whole lot of opportunities to express that, so you can bet your bottom dollar that when I do get a chance, I capitalize on it. I made a booklet and titled it "The ABCs of my Love for you" and yes, it is exactly what it sounds like. I made 26 pages of sweet sayings, emphasizing one letter of the alphabet on each page.

This is how I did it:
I used water color paper, sharpies, and stickers to create this adorable little booklet. I bought a pad of water color paper that was 6" x 8" and cut them in half to be 6" x 4". I was two pages short, so I also bought blue card stock and used it for the front and back cover, and the 'C' and 'T' pages (for Claira and Travis). Then, I went through each page, placed a letter sticker on it, wrote my phrase, and decorated it with sharpies. For some pages, I even used water colors, just for fun :)

Here are the phrases that I used for each letter:

A: Together, I know we can get through anything
B: You are my very best friend
C: My heart loses all control when I’m around you
D: Every day that we are together is like a dream come true
E: I will love you endlessly
F: Our love is better than the best fairy tale
G: I am so grateful to have you in my life
H: Inside your hug is my favorite place to be
I: The intimacy between us is like nothing I have ever known
J: Simply being around you brings me so much joy
K: You know how to kiss me just right
L: You make me laugh like no one else can
M: I love you to the moon and back, twice
N: Loving you just comes so natural to me
O: I am obsessed with how perfectly our hands fit together
P: Without a doubt, you are my prince charming
Q: Spending quiet moments with you is so refreshing
R: Your love for me is relentless
S: You made me believe in soul mates by becoming mine
T: Because of you, I know what true love is
U: The way that you just get me is unbelievable
V: Just listening to your sweet voice is enough to make me smile
W: Our weirdness matches each other perfectly
X: Whenever I think about our future, I get so x-cited to see what’s coming our way
Y: I find myself yearning to be close to you

Z: We could spend the next zillion years together and I wouldn't feel like I've had long enough with you


The Evidence:


The Verdict:
Of course, there are several different ways you could modify this idea. Try saying something sweet by starting each sentence with a letter from the alphabet, or list 26 different things that you love about your honey that start with each letter. Really, the possibilities here are endless. I bet it would even work for kids (if you have them) on Valentine's Day or when they're having a rough week. 

I just really liked the idea of using the alphabet as a template for expressing my love for my wonderful man, and he really seemed to like it too :)