My new domain is alittlepeaceofhome.com and I would love for you to take a couple minutes to come check out my latest content there. Thank you for your interest!
Saturday, May 28, 2016
Last Post Here, Come Find Me
Blogging here over the last few years has been a great learning experience. Since this was my first experience with really attempting any sort of blog, I would say that it definitely could have gone worse. However, I think I'm ready to run with the big boys now and get my own domain. Hopefully loads of followers and page views will follow, but we shall see.
Saturday, January 9, 2016
Happy New Year!
Happy New Year!! I am undoubtedly behind on my previous resolution, and I won't try to make excuses about that. Mostly, I've been busy and haven't been making the time to document what I've done here. I am still working on finding time to get caught up on sharing all the things I did in 2015, although I was nowhere near reaching my goal of 12 new crafts, 12 new recipes, 10 new DIY beauty hacks, and reading 6 books. I did however, take a handful of weekend trips, so at least that got accomplished! This year I'm keeping it very simple: blog more and keep trying new things.
In the coming weeks I will continue slowly catching up on all the posts that I want to share. I will also continue trying new things (most of them will surely be from things that I've saved on Pinterest). Although we're only 9 days into the new year, I get the feeling that it will be a life changing one for me. No major plans are on the books yet, but a lot can happen in the next 356 days and I can't wait to embrace all that comes my way!
In the coming weeks I will continue slowly catching up on all the posts that I want to share. I will also continue trying new things (most of them will surely be from things that I've saved on Pinterest). Although we're only 9 days into the new year, I get the feeling that it will be a life changing one for me. No major plans are on the books yet, but a lot can happen in the next 356 days and I can't wait to embrace all that comes my way!
Friday, December 25, 2015
Graduation Shadow Box

After taking the time to decorate my cap for graduation, I wasn't about to toss it in the back of my closet until I had something better to do with it. I came up with something better right away! I decided the best thing for me to do is to put it in a shadow box with my cords so that I can display it with my diploma. Here's how I did it:
Supplies:
Shadow box (I used a 12"x12" box that I got from Hobby Lobby. If you use the 40% off coupon that they have each week, it become really affordable! You could also get a bigger one if you wanted to fold up your gown and include in the box as a background.)
Graduation garb
Small pins
Directions:
There isn't much to this project aside from arranging the items and pinning them down to the backing well enough for them to stay put when you hang it up.
Tips:
- It's probably best to place the biggest items where you want them first. Smaller items are easier to squeeze in somewhere.
- If you aren't happy with your first (or second, or third) placement of all your items, don't be afraid to take everything off and start all over.
- Don't pin anything down until you're happy with the entire placement. It could end up being more work in the long run if you have to keep unpinning things.
- Remember that it's okay for some things to stick out a bit. The whole point of a shadow box is to display something that isn't flat!
If you have any other tips, suggestions, or questions, don't hesitate to use the comments section to express them! Good luck fellow crafters!
Monday, November 9, 2015
Rice and Black Bean Stuffed Peppers
Here's another new recipe that I tried as a part of my resolution to try 12 new recipes. I am definitely slacking on this resolution, but hey, I still have 2 months left in the year, so I'm not worried! (Apparently, graduating has no bearing on past procrastination habits :) )
So, before I share this recipe, I have a small side note. I found a recipe for stuffed peppers on Pinterest (of course!), and I modified it some, but not entirely. That being said, after eating the stuffed peppers, I decided that I needed to make a few more minor changes, so the recipe I'm sharing is the one I will be using next time. Now, without further adieu, check out this tasty vegetarian dish:
Ingredients:
4 green bell peppers, tops cut off and insides hollowed out
2 cups cooked brown rice
1 can black beans
1 large onion, diced
2 cloves minced garlice
2 tsp. vegetable oil
1/2 tsp. oregano
1/4 grated mozzarella cheese
Directions:
1. Preheat oven to 375. Meanwhile, saute garlic and onion in a large pan until onion is translucent. Next add cooked rice and black beans. Cook until heated through.
2. Set bell peppers into a baking dish. Fill each bell pepper with rice and bean mixture. Bake for 30 minutes or so. Pull the peppers out, top with mozzarella cheese, and bake for another 10-15 minutes, until cheese is melted and slightly golden brown.
3. Serve warm and refrigerate leftovers.
That's it! It was easy and tasty. I can hardly wait to try this new version! Share your favorite stuffed peppers recipe in the comments; I would love to give it a try!


Saturday, September 12, 2015
Small Smashed Potatoes
First off, I am completely aware of how long it has been since my last post, but to be fair, post-graduation life has held a lot of new adventures that have been taking up most of my time. Secondly, I have been keeping up with my resolutions, continuing to try new things, I just haven't made the time to share them here. That being said, here is the start of my effort to get all caught up!
Small Smashed Potatoes:
Ingredients:
Small Smashed Potatoes:
Ingredients:
- 3-4 small potatoes per person (I used both red and yellow potatoes)
- 1 tablespoon olive oil per person
- salt & pepper
Directions:
1. Place the potatoes in a pot of water and boil them until they are tender. This should take about 20 minutes, depending on how many potatoes you are cooking. When they are finished cooking, drain the water and let them cool for a few minutes, so they are not too hot to handle.
2. Preheat oven to 450 degrees. Pat the potatoes dry and smash each one with something flat, like a small plate or the bottom of a measuring cup. Put smashed potatoes onto a baking sheet.
3. Drizzle the olive oil over the potatoes and season with salt and pepper, making sure that the potatoes are evenly coated.
4. Cook the potatoes in the oven for about 15 minutes. Take them out, flip them over, and cook them for an additional 10-15 minutes. Serve the potatoes warm, and store the leftovers in the fridge.
These potatoes come out crispy and delicious! To give this recipe some more flavor, try using garlic salt or garnishing them with chopped parsley.


Monday, May 18, 2015
Cheesy Enchilada Rice Skillet
Here is the first of 12 new recipes that I have decided to try this year! I got the original recipe from here, but I made some adjustments for my own benefit, so they aren't exactly the same.
Cheesy Enchilada Rice Skillet
Ingredients:
2 cups uncooked brown rice
1.5 tablespoons olive oil
4 cloves garlic, minced
1 small onion, chopped
1 bell pepper, chopped
2 cups frozen corn
1 can black beans, rinsed and drained
1 can enchilada sauce
1 teaspoon chili powder
1/2 teaspoon cumin
1/2 teaspoon oregano
1-2 cups shredded Mexican cheese blend
Directions:
1. Cook rice according to package instructions and set aside.
2. Heat olive oil in large skillet and add garlic, onion, bell pepper, and corn. Cook until onions are translucent.
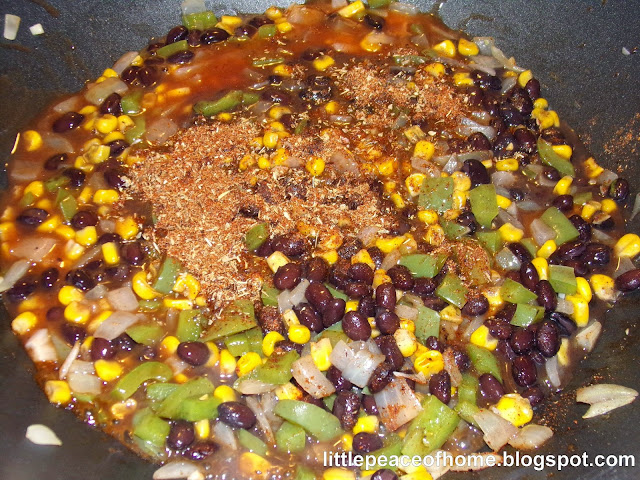
3. Add in black beans, enchilada sauce, chili powder, cumin and oregano, and stir until well combined. Add in cooked rice and stir.
4. Top with cheese and wait a few minutes until the cheese is melted.
5. Serve warm with tortillas.
Tell me what you think about this recipe in the comments! I sure enjoyed it :)


Cheesy Enchilada Rice Skillet
Ingredients:
2 cups uncooked brown rice
1.5 tablespoons olive oil
4 cloves garlic, minced
1 small onion, chopped
1 bell pepper, chopped
2 cups frozen corn
1 can black beans, rinsed and drained
1 can enchilada sauce
1 teaspoon chili powder
1/2 teaspoon cumin
1/2 teaspoon oregano
1-2 cups shredded Mexican cheese blend
Directions:
1. Cook rice according to package instructions and set aside.
2. Heat olive oil in large skillet and add garlic, onion, bell pepper, and corn. Cook until onions are translucent.
3. Add in black beans, enchilada sauce, chili powder, cumin and oregano, and stir until well combined. Add in cooked rice and stir.
4. Top with cheese and wait a few minutes until the cheese is melted.
5. Serve warm with tortillas.
Tell me what you think about this recipe in the comments! I sure enjoyed it :)


Tuesday, March 10, 2015
Buttoned Letter
One of the best things you can do with a bunch of random buttons is use them to decorate your home. Check it out:
This is another incredibly easy project.
Supplies:
Wooden Letter (I bet you'll be shocked to hear that I got mine from Hobby Lobby ;) )
Paint (I chose to use a pearly white)
Buttons (I chose to go with a white, pink, and brown color scheme)
Hot glue gun
1. Paint your letter and let it dry. Keep in mind that it may need a second coat.
2. While your paint is drying, gather some buttons that will go well together. Don't worry about making sure that they all match perfectly well. Having a sort of "statement piece" button is part of the creativity!
3. Glue your buttons onto your letter. Try to arrange them in a way that covers most of letter but doesn't crowd it. It's a good idea to play with different arrangements before you actually start gluing things down.
4. Find a place for it and display it. You can hang it up on a wall or cabinet or buy a simple plate display stand to display it on a shelf or mantel.

Subscribe to:
Comments (Atom)